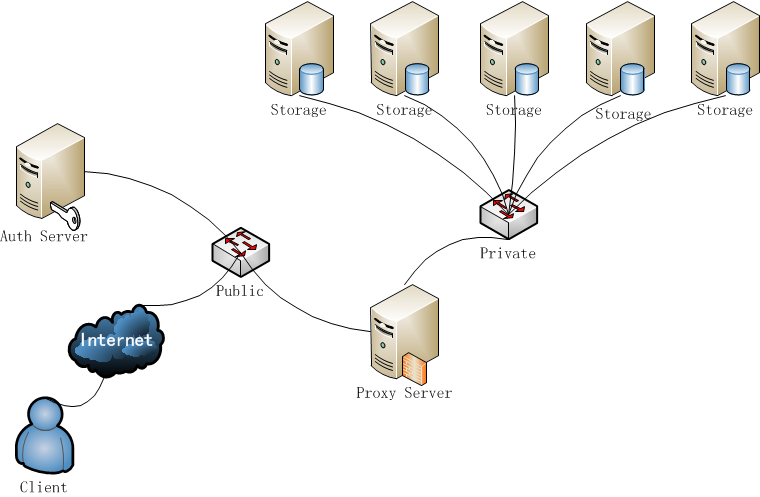
Example Installation Architecture

node - a host machine running one or more OpenStack Object Storage services

Proxy node - node that runs Proxy services

Auth node - an optional node that runs the Auth service separately from the Proxy services

Storage node - node that runs Account, Container, and Object services

ring - a set of mappings of OpenStack Object Storage data to physical devices

To increase reliability, you may want to add additional Proxy servers for performance.


Installing and Configuring an Auth Node

There are options for running an authorization node to authorize requests against a swift cluster. Swauth is one implementation, an auth service for Swift as WSGI middleware that uses Swift itself as a backing store. Swauth, the example authorization system that was bundled with the Cactus release, is now available as a separate download rather than part of Swift, at https://github.com/gholt/swauth. You can install it on the proxy server, or on a separate server, but you need to point to swauth from the proxy-server.conf file in the following line:

[filter:swauth]
use = egg:swauth#swauth

Installing and Configuring the Proxy Node
The proxy server takes each request and looks up locations for the account, container, or object and routes the requests correctly. The proxy server also handles API requests. You enable account management by configuring it in the proxy-server.conf file.

1. Install swift-proxy service:
apt-get install swift-proxy memcached

2. Create self-signed cert for SSL:

cd /etc/swift
openssl req -new -x509 -nodes -out cert.crt -keyout cert.key

3. Modify memcached to listen on the default interfaces. Preferably this should be on a local, non-public network. Edit the following line in /etc/memcached.conf, changing:
-l 127.0.0.1
to
-l
4. Restart the memcached server:
service memcached restart
5. Create /etc/swift/proxy-server.conf:
[DEFAULT]
# Enter these next two values if using SSL certifications
cert_file = /etc/swift/cert.crt
key_file = /etc/swift/cert.key
bind_port = 8080
workers = 8
user = swift
[pipeline:main]
# keep swauth in the line below if you plan to use swauth for authentication
pipeline = healthcheck cache swauth proxy-server
[app:proxy-server]
use = egg:swift#proxy
allow_account_management = true
[filter:swauth]
# the line below points to swauth as a separate project from swift
use = egg:swauth#swauth
# Highly recommended to change this.
super_admin_key = swauthkey
[filter:healthcheck]
use = egg:swift#healthcheck
[filter:cache]
use = egg:swift#memcache
memcache_servers =
:11211
6. Create the account, container and object rings:
cd /etc/swift
swift-ring-builder account.builder create 18 3 1
swift-ring-builder container.builder create 18 3 1
swift-ring-builder object.builder create 18 3 1
7. For every storage device on each node add entries to each ring:
swift-ring-builder account.builder add z-:6002/ 100
swift-ring-builder container.builder add z-:6001/ 100
swift-ring-builder object.builder add z-:6000/ 100
For example, if you were setting up a storage node with a partition of /dev/sdb1 in Zone 1 on IP 10.0.0.1, the DEVICE would be sdb1 and the commands would look like:
swift-ring-builder account.builder add z1-10.0.0.1:6002/sdb1 100
swift-ring-builder container.builder add z1-10.0.0.1:6001/sdb1 100
swift-ring-builder object.builder add z1-10.0.0.1:6000/sdb1 100
8. Verify the ring contents for each ring:
swift-ring-builder account.builder
swift-ring-builder container.builder
swift-ring-builder object.builder
9. Rebalance the rings:
swift-ring-builder account.builder rebalance
swift-ring-builder container.builder rebalance
swift-ring-builder object.builder rebalance
10. Copy the account.ring.gz, container.ring.gz, and object.ring.gz files to each of the Proxy and Storage nodes in /etc/swift.
11. Make sure all the config files are owned by the swift user:
chown -R swift:swift /etc/swift
12. Start Proxy services:
swift-init proxy start
Installing and Configuring the Storage Nodes
1. Install Storage node packages:
apt-get install swift-account swift-container swift-object xfsprogs
2. For every device on the node, setup the XFS volume (/dev/sdb is used as an example):
fdisk /dev/sdb (set up a single partition)
mkfs.xfs -i size=1024 /dev/sdb1
echo "/dev/sdb1 /srv/node/sdb1 xfs noatime,nodiratime,nobarrier,logbufs=8 0 0" >> /etc/fstab
mkdir -p /srv/node/sdb1
mount /srv/node/sdb1
chown -R swift:swift /srv/node
3. Create /etc/rsyncd.conf:
uid = swift
gid = swift
log file = /var/log/rsyncd.log
pid file = /var/run/rsyncd.pid
address =
[account]
max connections = 2
path = /srv/node/
read only = false
lock file = /var/lock/account.lock
[container]
max connections = 2
path = /srv/node/
read only = false
lock file = /var/lock/container.lock
[object]
max connections = 2
path = /srv/node/
read only = false
lock file = /var/lock/object.lock
4. Edit the following line in /etc/default/rsync:
RSYNC_ENABLE = true
5. Start rsync daemon:
service rsync start
6. Create /etc/swift/account-server.conf:
[DEFAULT]
bind_ip =
workers = 2
[pipeline:main]
pipeline = account-server
[app:account-server]
use = egg:swift#account
[account-replicator]
[account-auditor]
[account-reaper]
7. Create /etc/swift/container-server.conf:
[DEFAULT]
bind_ip =
workers = 2
[pipeline:main]
pipeline = container-server
[app:container-server]
use = egg:swift#container
[container-replicator]
[container-updater]
[container-auditor]
8. Create /etc/swift/object-server.conf:
[DEFAULT]
bind_ip =
workers = 2
[pipeline:main]
pipeline = object-server
[app:object-server]
use = egg:swift#object
[object-replicator]
[object-updater]
[object-auditor]
9. Start the storage services:
swift-init object-server start
swift-init object-replicator start
swift-init object-updater start
swift-init object-auditor start
swift-init container-server start
swift-init container-replicator start
swift-init container-updater start
swift-init container-auditor start
swift-init account-server start
swift-init account-replicator start
swift-init account-auditor start
Create OpenStack Object Storage admin Account and Verify the Installation
You can run these commands from the proxy server if you have installed swauth there. Look for the default_swift_cluster setting in the proxy-server.conf and match the URLs (including http or https) when issuing swauth commands.
1. Prepare the system for authorization commands by telling it the key and the URL for auth.
swauth-prep -K key -A http://:8080/auth/
example: swauth-prep -K swauth -A https://172.17.142.17:8080/auth/
2. Create a user with administrative privileges (account = system, username = root, password = testpass). Make sure to replace key in the swauth-add-user command below with whatever super_admin key you assigned in the proxy-server.conf file above. None of the values of account, username, or password are special - they can be anything.
swauth-add-user -K key -A http://:8080/auth/ -a system root testpass
example: swauth-add-user -K swauth -A https://172.17.142.17:8080/auth/ -a system root testpass
3. Get an X-Storage-Url and X-Auth-Token:
curl -k -v -H 'X-Storage-User: system:root' -H 'X-Storage-Pass: testpass' http://:8080/auth/v1.0
example: curl -k -v -H 'X-Storage-User: system:root' -H 'X-Storage-Pass: testpass' https://172.17.142.17:8080/auth/v1.0
* About to connect() to 172.17.142.17 port 8080 (#0)
*   Trying 172.17.142.17... connected
* successfully set certificate verify locations:
*   CAfile: none
  CApath: /etc/ssl/certs
* SSLv3, TLS handshake, Client hello (1):
* SSLv3, TLS handshake, Server hello (2):
* SSLv3, TLS handshake, CERT (11):
* SSLv3, TLS handshake, Server finished (14):
* SSLv3, TLS handshake, Client key exchange (16):
* SSLv3, TLS change cipher, Client hello (1):
* SSLv3, TLS handshake, Finished (20):
* SSLv3, TLS change cipher, Client hello (1):
* SSLv3, TLS handshake, Finished (20):
* SSL connection using AES256-SHA
* Server certificate:
*        subject: C=AU; ST=Some-State; O=Internet Widgits Pty Ltd
*        start date: 2011-05-17 01:10:07 GMT
*        expire date: 2011-06-16 01:10:07 GMT
* SSL: unable to obtain common name from peer certificate
> GET /auth/v1.0 HTTP/1.1
> User-Agent: curl/7.22.0 (x86_64-pc-linux-gnu) libcurl/7.22.0 OpenSSL/1.0.1 zlib/1.2.3.4 libidn/1.23 librtmp/2.3
> Host: 172.17.142.17:8080
> Accept: */*
> X-Storage-User: system:root
> X-Storage-Pass: testpass
>
< HTTP/1.1 200 OK
< X-Storage-Url: https://172.17.142.17:8080/v1/AUTH_c7470efc-2521-4f69-8147-396e6f863531
< X-Storage-Token: AUTH_tk9c002f343886417f91fe2a7bf5388d52
< X-Auth-Token: AUTH_tk9c002f343886417f91fe2a7bf5388d52
< Content-Length: 117
< Date: Tue, 24 Apr 2012 08:19:32 GMT
<
* Connection #0 to host 172.17.142.17 left intact
* Closing connection #0
* SSLv3, TLS alert, Client hello (1):
{"storage": {"default": "local", "local": "https://172.17.142.17:8080/v1/AUTH_c7470efc-2521-4f69-8147-396e6f863531"}}
4. Check that you can HEAD the account:
curl -k -v -H 'X-Auth-Token: '
5. Check that the Swift Tool, swift, works:
swift -A http://:8080/auth/v1.0 -U system:root -K testpass stat
example: swift -A https://172.17.142.17:8080/auth/v1.0 -U system:root -K testpass stat
6. Use swift to upload a few files named ‘bigfile[1-2].tgz’ to a container named ‘myfiles’:
swift -A http://:8080/auth/v1.0 -U system:root -K testpass upload myfiles bigfile1.tgz
swift -A http://:8080/auth/v1.0 -U system:root -K testpass upload myfiles bigfile2.tgz
example:
swift -A https://172.17.142.17:8080/auth/v1.0 -U system:root -K testpass upload myfiles bigfile1.tgz
swift -A https://172.17.142.17:8080/auth/v1.0 -U system:root -K testpass upload myfiles bigfile2.tgz
7. Use swift to download all files from the ‘myfiles’ container:
swift -A http://:8080/auth/v1.0 -U system:root -K testpass download myfiles
example:
swift -A https://172.17.142.17:8080/auth/v1.0 -U system:root -K testpass download myfiles
Adding an Additional Proxy Server
For reliability’s sake you may want to have more than one proxy server. You can set up the additional proxy node in the same manner that you set up the first proxy node but with additional configuration steps.
Once you have more than two proxies, you also want to load balance between the two, which means your storage endpoint also changes. You can select from different strategies for load balancing. For example, you could use round robin dns, or an actual load balancer (like pound) in front of the two proxies, and point your storage url to the load balancer.
See Configure the Proxy node for the initial setup, and then follow these additional steps.
1. Update the list of memcache servers in /etc/swift/proxy-server.conf for all the added proxy servers. If you run multiple memcache servers, use this pattern for the multiple IP:port listings:
10.1.2.3:11211,10.1.2.4:11211
in each proxy server’s conf file.:
[filter:cache]
use = egg:swift#memcache
memcache_servers = :11211
2. Change the default_cluster_url to point to the load balanced url, rather than the first proxy server you created in /etc/swift/proxy-server.conf:
[app:auth-server]
use = egg:swift#auth
default_cluster_url = https:///v1
# Highly recommended to change this key to something else!
super_admin_key = devauth
3. After you change the default_cluster_url setting, you have to delete the auth database and recreate the OpenStack Object Storage users, or manually update the auth database with the correct URL for each account.
4. Next, copy all the ring information to all the nodes, including your new proxy nodes, and ensure the ring info gets to all the storage nodes as well.
5. After you sync all the nodes, make sure the admin has the keys in /etc/swift and the ownership for the ring file is correct.

 Installing and Configuring an Auth Node
There are options for running an authorization node to authorize requests against a swift cluster. Swauth is one implementation, an auth service for Swift as WSGI middleware that uses Swift itself as a backing store. Swauth, the example authorization system that was bundled with the Cactus release, is now available as a separate download rather than part of Swift, at https://github.com/gholt/swauth. You can install it on the proxy server, or on a separate server, but you need to point to swauth from the proxy-server.conf file in the following line:
[filter:swauth]
use = egg:swauth#swauth
Installing and Configuring the Proxy Node
The proxy server takes each request and looks up locations for the account, container, or object and routes the requests correctly. The proxy server also handles API requests. You enable account management by configuring it in the proxy-server.conf file.
1. Install swift-proxy service:
apt-get install swift-proxy memcached
2. Create self-signed cert for SSL:
cd /etc/swift
openssl req -new -x509 -nodes -out cert.crt -keyout cert.key
3. Modify memcached to listen on the default interfaces. Preferably this should be on a local, non-public network. Edit the following line in /etc/memcached.conf, changing:
-l 127.0.0.1
to
-l
Installing and Configuring an Auth Node
There are options for running an authorization node to authorize requests against a swift cluster. Swauth is one implementation, an auth service for Swift as WSGI middleware that uses Swift itself as a backing store. Swauth, the example authorization system that was bundled with the Cactus release, is now available as a separate download rather than part of Swift, at https://github.com/gholt/swauth. You can install it on the proxy server, or on a separate server, but you need to point to swauth from the proxy-server.conf file in the following line:
[filter:swauth]
use = egg:swauth#swauth
Installing and Configuring the Proxy Node
The proxy server takes each request and looks up locations for the account, container, or object and routes the requests correctly. The proxy server also handles API requests. You enable account management by configuring it in the proxy-server.conf file.
1. Install swift-proxy service:
apt-get install swift-proxy memcached
2. Create self-signed cert for SSL:
cd /etc/swift
openssl req -new -x509 -nodes -out cert.crt -keyout cert.key
3. Modify memcached to listen on the default interfaces. Preferably this should be on a local, non-public network. Edit the following line in /etc/memcached.conf, changing:
-l 127.0.0.1
to
-l 

留言
張貼留言