Kubernetes Autoscaling 101: Cluster Autoscaler, Horizontal Pod Autoscaler, and Vertical Pod Autoscaler
Kubernetes at its core is a resources management and orchestration tool. It is ok to focus day-1 operations to explore and play around with its cool features to deploy, monitor and control your pods. However, you need to think of day-2 operations as well. You need to focus on questions like:
- How am I going to scale pods and applications?
- How can I keep containers running in a healthy state and running efficiently?
- With the on-going changes in my code and my users’ workloads, how can I keep up with such changes?
I’m providing in this post a high-level overview of different scalability mechanisms inside Kubernetes and best ways to make them serve your needs. Remember, to truly master Kubernetes, you need to master different ways to manage the scale of cluster resources, that’s the core of promise of Kubernetes.
Configuring Kubernetes clusters to balance resources and performance can be challenging, and requires expert knowledge of the inner workings of Kubernetes. Just because your app or services’ workload isn’t constant, it rather fluctuates throughout the day if not the hour. Think of it as a journey and ongoing process.
Kubernetes Autoscaling Building Blocks
Effective kubernetes auto-scaling requires coordination between two layers of scalability: (1) Pods layer autoscalers, this includes Horizontal Pod Autoscaler (HPA) and Vertical Pod Autoscaler (VPA); both scale available resources for your containers, and (2) cluster level scalability, which managed by the Cluster Autoscaler (CA); it scales up or down the number of nodes inside your cluster.
Horizontal Pod Autoscaler (HPA)
As the name implies, HPA scales the number of pod replicas. Most DevOps use CPU and memory as the triggers to scale more pod replicas or less. However, you can configure it to scale your pods based on custom metrics, multiple metrics, or even external metrics.
High-level HPA workflow
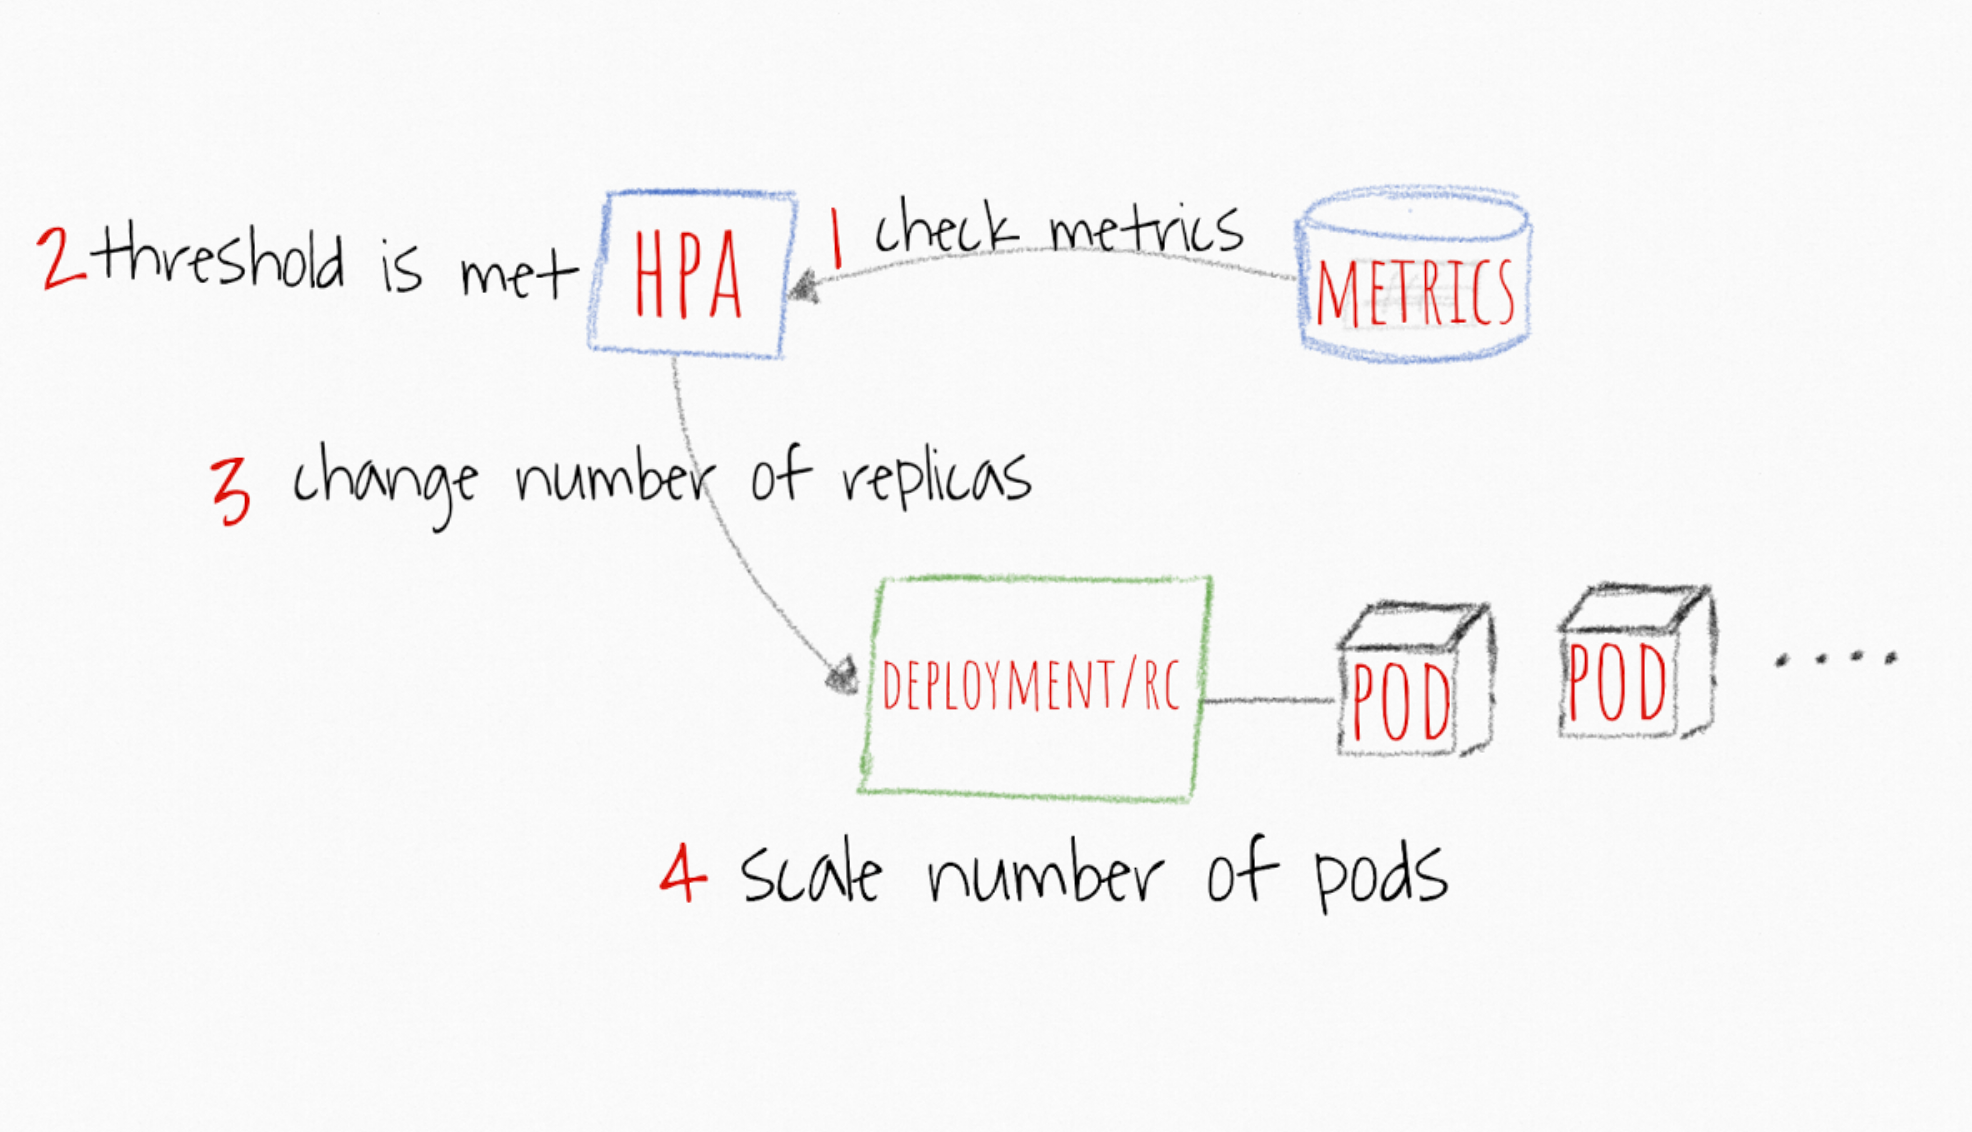
- HPA continuously checks metrics values you configure during setup AT A DEFAULT 30 SEC intervals
- HPA attempts to increase the number of pods If the SPECIFIED threshold is met
- HPA mainly updates the number of replicas inside the deployment or replication controller
- The Deployment/Replication Controller WOULD THEN roll-out ANY additional needed pods
Consider these as you rollout HPA:
- The default HPA check interval is 30 seconds. This can be configured through the — horizontal-pod-autoscaler-sync-period flag of the controller manager
- Default HPA relative metrics tolerance is 10%
- HPA waits for 3 minutes after the last scale-up events to allow metrics to stabilize. This can also be configured through — horizontal-pod-autoscaler-upscale-delay flag
- HPA waits for 5 minutes from the last scale-down event to avoid autoscaler thrashing. Configurable through — horizontal-pod-autoscaler-downscale-delay flag
- HPA works best with deployment objects as opposed to replication controllers. Does not work with rolling update using direct manipulation of replication controllers. It depends on the deployment object to manage the size of underlying replica sets when you do a deployment
Vertical Pods Autoscaler
Vertical Pods Autoscaler (VPA) allocates more (or less) cpu or memory to existing pods. Think of it as giving pods some growth hormones :) It can work for both stateful and stateless pods but it is built mainly for stateful services. However, you can use it for stateless pods as well if you would like to implement an auto-correction of resources you initially allocated for your pods. VPA can also reacts to OOM (out of memory) events. VPA requires currently for the pods to be restarted to change allocated cpu and memory. When VPA restarts pods it respects pods distribution budget (PDB) to make sure there is always the minimum required number of of pods. You can set the min and max of resources that the VPA can allocate to any of your pods. For example, you can limit the maximum memory limit to be no more than 8 GB. This is useful in particular when you know that your current nodes cannot allocate more than 8 GB per container. Read the VPA’s official wiki page for detailed spec and design.
VPA has also an interesting feature called the VPA Recommender. It watches the historic resources usage and OOM events of all pods to suggest new values of the “request” resources spec. The Recommender generally uses some smart algorithm to calculate memory and cpu values based on historic metrics. It also provides an API that takes the pod descriptor and provides suggested resources requests.
It worth mentioning that VPA Recommender doesn’t work on setting up the “limit” of resources. This can cause pods to monopolize resources inside your nodes. I suggest you set a “limit” value at the namespace level to avoid crazy consumption of memory or CPU
High-level VPA workflow
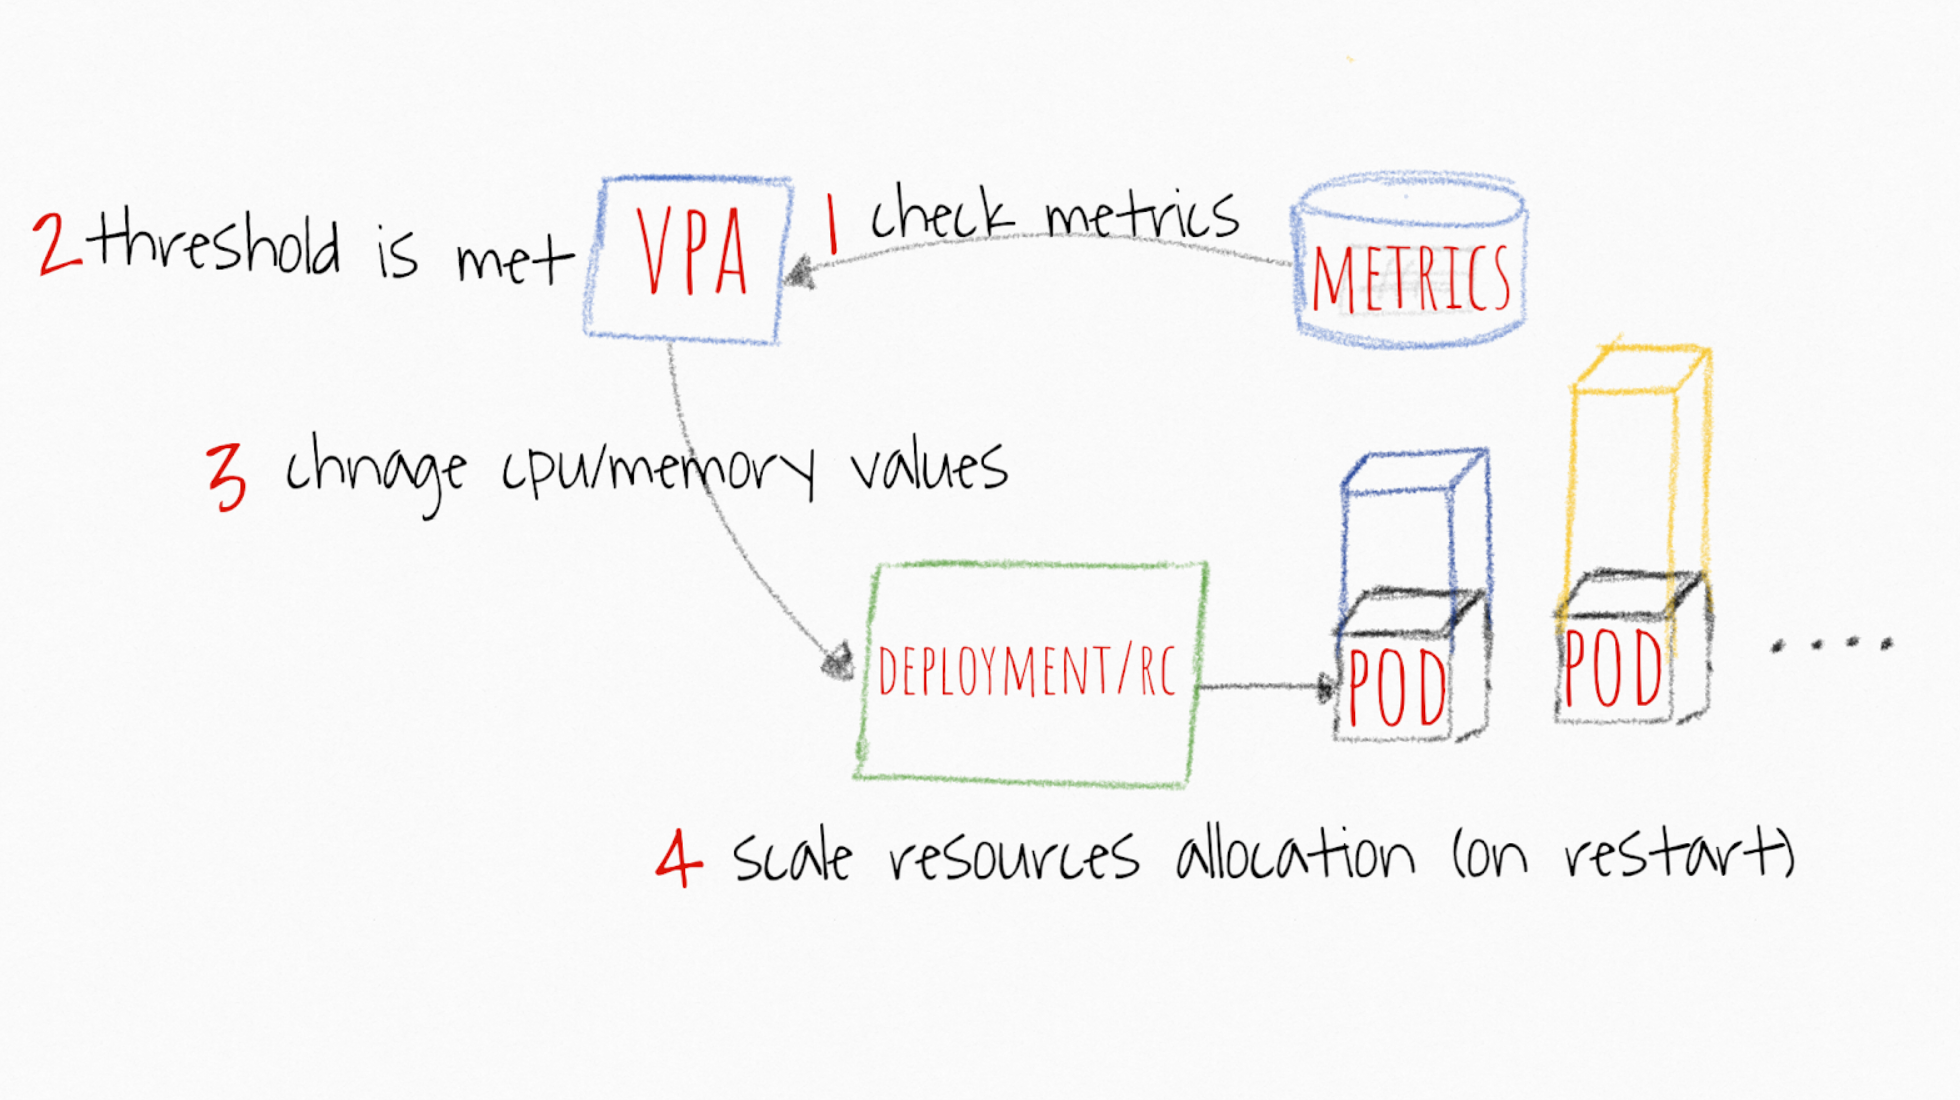
- VPA continuously checks metrics values you configured during setup AT A DEFAULT 10 SEC intervals
- VPA attempts to change the allocated memory and/or CPU If the threshold is met
- VPA mainly updates the resources inside the deployment or replication controller specs
- When pods are restarted the new resources all applied to the created instances.
A few Points to consider as you rollout the VPA:
- Changes in resources are not yet possible without restarting the pod. Main rational so far, is that such a change may cause a lot of instability. Hence, the thinking to restart the pods and let it be scheduled based on the newly allocated resources.
- VPA and HPA are not yet compatible with each other and cannot work on the same pods. Make sure you separate their scope in your setup if you are using them both inside the same cluster.
- VPA adjusts only the resources requests of containers based on past and current resource usage observed. It doesn’t set resources limits. This can be problematic with misbehaving applications which start using more and more resources leading to pods being killed by Kubernetes.
- VPA is in its early stage. It will evolve the next few months, be prepared for that :) Details on known limitations can be found here and on future work here
Cluster Autoscaler
Cluster Autoscaler (CA) scales your cluster nodes based on pending pods. It periodically checks whether there are any pending pods and increases the size of the cluster if more resources are needed and if the scaled up cluster is still within the user-provided constraints. CA interfaces with the cloud provider to request more nodes or deallocate idle nodes. It works with GCP, AWS and Azure. Version 1.0 (GA) was released with kubernetes 1.8.
High-level CA workflow
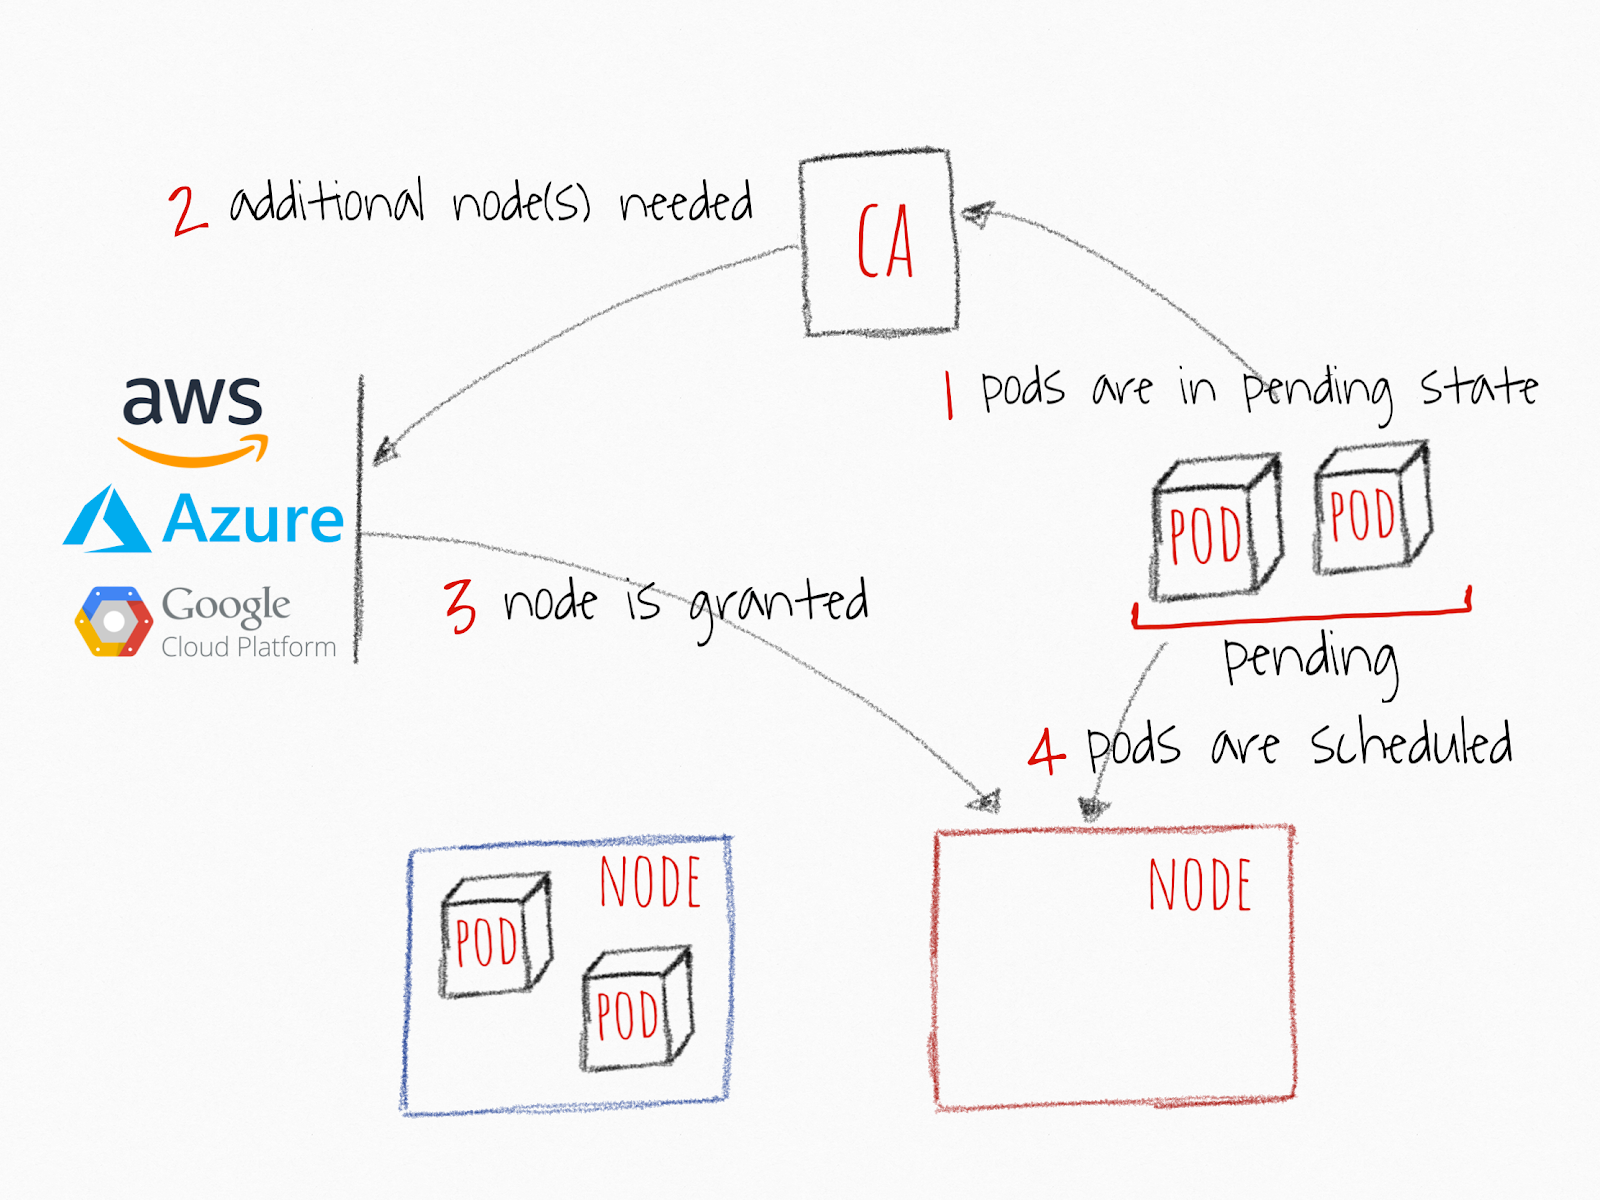
- The CA checks for pods in pending state at a default interval of 10 seconds.
- When If there is one or more pods in pending state because of there are not enough available resources on the cluster to allocate on the cluster them, then it attempts to provision one or more additional nodes.
- When the node is granted by the cloud provider, the node is joined to the cluster and becomes ready to serve pods.
- Kubernetes scheduler allocates the pending pods to the new node. If some pods are still in pending state, the process is repeated and more nodes are added to the cluster.
Consider these as you roll-out the CA
- Cluster Autoscaler makes sure that all pods in the cluster have a place to run, no matter if there is any CPU load or not. Moreover, it tries to ensure that there are no unneeded nodes in the cluster. (source)
- CA realizes a scalability need in about 30 seconds.
- CA waits for by default to 10 mins by default after a node becomes unneeded before it scales it down.
- CA has the concept of expanders. Expanders provide different strategies for selecting the node group to which new nodes will be added.
- Use “cluster-autoscaler.kubernetes.io/safe-to-evict”: “true” responsibly. If you set many of your pods or enough pods that are on all your nodes, you will lose a lot of flexibility to scale down.
- Use PodDisruptionBudgets to prevent pods from being deleted and end up part of your application fully non-functional.
How Kubernetes Autoscalers Interact Together
If you would like to reach nirvana autoscaling your Kubernetes cluster, you will need to use pod layer autoscalers with the CA. The way they work with each other is relatively simple as show in below illustration.

- HPA or VPA update pod replicas or resources allocated to an existing pod.
- If no enough nodes to run pods post scalability event, CA picks up the fact that some or all of the scaled pods in pending state.
- CA allocates new nodes
- Pods are scheduled on the provisioned nodes.
Common Mistakes
I’ve seen in different forums, such as Kubernetes slack channels and StackOverview questions, common issues due to some facts that many DevOps miss while getting their feet wet with autoscalers.
HPA and VPA depend on metrics and some historic data. If you don’t have enough resources allocated, your pods will be OOM killed and never get a chance to generate metrics. Your scale may never take place in this case.
Scaling up is the mostly a time sensitive operation. You want your pods and cluster to scale fairly quickly before your users experience any disruption or crashes in your application. You should consider the average time it can take your pods and cluster to scale up.
Best case scenario — 4 minutes
- 30 seconds — Target metrics values updated: 30–60 seconds
- 30 seconds — HPA checks on metrics values: 30 seconds ->
- < 2 seconds — pods created and goes into pending state — 1 second
- < 2 seconds — CA sees the pending pods and fires up the calls to provision nodes — 1 second
- 3 minutes — Cloud provider provision the nodes & K8 waits for them till they are ready: up to 10 minutes (depends on multiple factors)
(Reasonable) Worst case scenario — 12 minutes
- 60 seconds — Target metrics values updated
- 30 seconds — HPA checks on metrics values
- < 2 seconds — pods created and goes into pending state
- < 2 seconds — CA sees the pending pods and fires up the calls to provision nodes
- 10 minutes — Cloud provider provision the nodes & K8 waits for them till they are ready minutes (depends on multiple factors, such provider latency, OS latency, boot strapping tools, etc. )
Do not confuse cloud provider scalability mechanisms with the CA. CA works from within your cluster while cloud provider’s scalability mechanism (such as ASGs inside AWS) work based on nodes allocation. It is not aware of what’s taking place with your pods or application. Using them together will render your cluster unstable and hard to predict behavior.
TL;DR
- Kubernetes is a resources management and orchestration tool. Day-2 operations to manage your pods and cluster’s resources is a key milestone in your journey mastering Kubernetes.
- Have the right mental model in mind focusing the pods scalability using HPA and VPA.
- CA is recommended if you have a good understanding of your pods and containers needs.
- Understanding how different autoscalers work together will help you configuring your cluster.
- Make sure you plan for worst case and best case scenarios when it comes to how long it will take your pods and cluster to scale up or down.

留言
張貼留言