發表文章

目前顯示的是 4月, 2012的文章

化整為零的次世代網頁開發標準: WSGI

圖片
reference: http://blog.ez2learn.com/2010/01/27/introduction-to-wsgi/ 今天,我要介紹Python網頁開發的標準: WSGI,我個人在看見這類英文縮寫時,都一定會試著去記住它的全寫,因為縮寫本身一點意義都沒有,難以記憶,WSGI的全寫是”Web Server Gateway Interface“,它的發音有點像是whiskey,光知道這個名字還是很難理解這到底是用來做什麼用的,簡單的來說,它是Python定義網頁程式和伺服器溝通的介面 如果你有寫過CGI (Common Gateway Interface),它的作用基本上就是和CGI類似的功用,定義一個標準的溝通方式,讓你寫的程式可以和伺服器溝通,但是WSGI不是設計用來給任何語言使用的,它是設計給Python用的,而它其實是基於CGI的延伸,在Python的部份進一步做更多的定義,而因為他是基於CGI,所以它也可以和CGI的介面相容,只要透過一個轉接器,就能把WSGI的程式接到CGI 說了這麼多,相信大部份人對於WSGI是什麼還是一頭霧水,會有一堆疑問,為什麼有了CGI還要有WSGI? Middleware又是什麼? 這很正常,我一開始也對WSGI一點概念都沒有,接下來我們就來介紹WSGI的特色。 一些基本的定義 WSGI是由Python的官方在PEP333所定義出來的,細節的定義請自行閱讀該規格,這篇文章希望能從較高的層面來著眼,所以在此只簡單介紹基本的概念,首先,如果你有寫過CGI的話,就知道CGI透過環境變數來取得外部資訊,基本上WSGI也是一樣透過環境變數來取得資訊,例如REQUEST_METHOD、SERVER_NAME、HTTP_xxx,如你所見它繼承了自CGI的環境變數,除此之外它還定義了一些額外的變數,例如wsgi.version是包含著wsgi介面版本的變數,我們取部份它定義的環境變數 REQUEST_METHOD The HTTP request method, such as “GET” or “POST”. This cannot ever be an empty string, and so is always required. SCRIPT_NAME The initial portion

WSGI 初探

圖片
WSGI是什麼? WSGI的官方定義是,the Python Web Server Gateway Interface。從名字就可以看出來,這東西是一個Gateway,也就是網關。網關的作用就是在協議之間進行轉換。 下面對本文出現的一些名詞做定義。 wsgi app ,又稱應用,就是一個WSGI application,wsgi container ,又稱容器,雖然這個部分常常被稱為handler,不過我個人認為handler容易和app混淆,所以我稱之為容器,wsgi_middleware ,又稱中間件 。一種特殊類型的程序,專門負責在容器和應用之間。 理解的WSGI架構圖吧 WSGI應用 WSGI應用其實就是一個callable的對象。舉一個最簡單的例子,假設存在如下的一個應用: Python代码 def application(environ, start_response): status = '200 OK' output = 'World!' response_headers = [('Content-type', 'text/plain'), ('Content-Length', str(12)] write = start_response(status, response_headers) write('Hello ') return [output] 這個WSGI應用簡單的可以用簡陋來形容,但是他的確是一個功能完整的WSGI應用。只不過給人留下了太多的疑點,environ是什麼? start_response是什麼?為什麼可以同時用write和return來返回內容? 對於這些疑問,不妨自己猜測一下他的作用。聯想到CGI,那麼environ可能就是一系列的環境變量,用來表示HTTP請求的信息,比如說method之類的。 start_response,可能是接受HTTP response頭信息,然後返回一個write函數,這個write函數可以把HTTP response的body返回給客戶端。 return自然是將H

swift多節點安裝

reference : http://www.openstack.org.cn/bbs/forum.php?mod=viewthread&tid=264&reltid=648&pre_pos=1&ext=

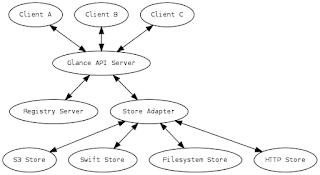
Glance Architecture

圖片
Glance is designed to be as adaptable as possible for various back-end storage and registry database solutions.There is a main Glance API server (the glance-api program) that serves as the communications hub between various client programs, the registry of image metadata, and the storage systems that actually contain the virtual machine image data. What is a Registry Server? A registry server is a service that publishes image metadata for internal consumption by the Glance API server. The Glance registry server uses a SQL database for its metdata storage. What is a Store? A store is a Python class that inherits from glance.store.Backend and conforms to that class’ API for reading, writing, and deleting virtual machine image data. Glance currently ships with stores for S3, Swift, RBD, a simple filesystem store, and a read-only HTTP(S) store. Implementors are encouraged to create stores for other backends, including other distributed storage systems like Sheepdog. glance-ap

AMQP協議

圖片
當前各種應用大量使用異步消息模型,並隨之產生眾多消息中間件產品及協議,標準的不一致使應用與中間件之間的耦合限制產品的選擇,並增加維護成本。 AMQP是一個提供統一消息服務的應用層標準協議,基於此協議的客戶端與消息中間件可傳遞消息,並不受客戶端/中間件不同產品,不同開發語言等條件的限制。 當然這種降低耦合的機制是基於與上層產品,語言無關的協議。 AMQP協議是一種二進制協議,提供客戶端應用與消息中間件之間異步、安全、高效地交互。從整體來看,AMQP協議可劃分為三層: 這種分層架構類似於OSI網絡協議,可替換各層實現而不影響與其它層的交互。 AMQP定義了合適的服務器端域模型,用於規範服務器的行為(AMQP服務器端可稱為broker)。在這裡Model層決定這些基本域模型所產生的行為,這種行為在AMQP中用”command”表示,在後文中會著重來分析這些域模型。 Session層定義客戶端與broker之間的通信(通信雙方​​都是一個peer,可互稱做partner),為command的可靠傳輸提供保障。 Transport層專注於數據傳送,並與Session保持交互,接受上層的數據,組裝成二進制流,傳送到receiver後再解析數據,交付給Session層。 Session層需要Transport層完成網絡異常情況的匯報,順序傳送command等工作。 上面是對AMQP協議的大致說明。下面會以我們對消息服務的需求來理解AMQP所提供的域模型。 消息中間件的主要功能是消息的路由(Routing)和緩存(Buffering)。在AMQP中提供類似功能的兩種域模型:Exchange 和Message queue。 Exchange接收消息生產者(Message Producer)發送的消息根據不同的路由算法將消息發送往Message queue。 Message queue會在消息不能被正常消費時緩存這些消息,具體的緩存策略由實現者決定,當message queue與消息消費者(Message consumer)之間的連接通暢時,Message queue有將消息轉發到consumer的責任。 Message是當前模型中所操縱的基本單位,它由Producer產生,經過Broker被Consumer所消費。它的基本結構有兩部分: Header和Bo

OpenStack Object Storage(Swift)component

Dependent component: 1. Memcached Distributed caching system, mainly in the swift for the token and account information, the container information storage 2. Sqlite Lightweight database engine in the swift is mainly used to manage the account and the container database 3. rsync Remote synchronization tool for data synchronization between the storage node 4. XFS File system 5. WSGI Python Web services gateway interface, package management tool through paste.deploy swift various service processes, middleware processes 6. Eventlet Python engage in concurrent network programming library, swift all server processes are dependent on the library Major components: 1. Ring 在基本架構圖中,沒有畫出ring文件,但是它卻是整個Swift中最重要的組件。 ring文件是由一致性哈希算法生成,它的主要作用是存儲名字到位置的映射。 ring文件分為三類,分別是:account.ring,container.ring,object.ring。 對於account的請求,就能通過account_name查詢account.ring得到{'/account_name' : account_db_position}的映射,從而知道account數據庫文件在集群的位置; 對於container的請求,通過account_name和container_name查詢container.ri

OpenStack Object Storage(Swift)installation

圖片
Example Installation Architecture node - a host machine running one or more OpenStack Object Storage services Proxy node - node that runs Proxy services Auth node - an optional node that runs the Auth service separately from the Proxy services Storage node - node that runs Account, Container, and Object services ring - a set of mappings of OpenStack Object Storage data to physical devices To increase reliability, you may want to add additional Proxy servers for performance. Installing and Configuring an Auth Node There are options for running an authorization node to authorize requests against a swift cluster. Swauth is one implementation, an auth service for Swift as WSGI middleware that uses Swift itself as a backing store. Swauth, the example authorization system that was bundled with the Cactus release, is now available as a separate download rather than part of Swift, at https://github.com/gholt/swauth. You can install it on the proxy server, or on a separate ser

Install nova essex(all-in-one) with dodai-deploy on ubuntu 12.04

圖片
reference Guan, Xiaohua blog I will introduce how to install openstack nova essex(all-in-one) on ubuntu 12.04 with dodai-deploy. Install dodai-deploy Please refer to https://github.com/nii-cloud/dodai-deploy/wiki/User-guide for details. I will use the following command to install dodai-deploy. curl https://raw.github.com/nii-cloud/dodai-deploy/master/setup-env/setup-all-in-one.sh | sudo sh After installation, the Web UI can be accessed via url http://$SERVER:3000. In the page above, there is a step-by-step guidance. I will install nova with the same steps. Add a node Select a node and click "Create Node" button. After the node was added, the node will be displayed on the "Listing nodes" page. Install keystone essex Open the "New proposal" page, select "openstack essex keystone" and leave values of all the config items and config files as default. Click "Create Proposal" button, and the proposal of keystone will be c

openstack command line create vm

圖片
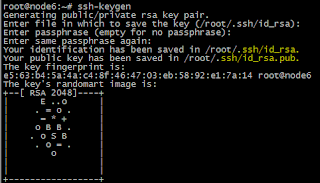
1: 創建密鑰 # ssh-keygen 2:上傳密鑰到數據庫 root@node6:~# nova keypair-list +------+-------------------------------- -----------------+ | Name | Fingerprint | +------+------------------- ------------------------------+ | key1 | 00:7e:41:a2:95:68:3d:03: a6:5b:df:84:a5:b9:06:32 | +------+-------------------------- -----------------------+ # # nova keypair-add --pub_key .ssh/id_rsa.pub key1 3:開始創建虛擬機 查看image list nova image-list 查看flavor-list 創建虛擬機 ~# nova boot --flavor 1 --image 1437c858-dec7-41d3-a97b-d6b7d5714ac9 --key_name key1 vm1 查看一下創建的虛擬機 nova s​​how vm1 ssh 訪問VM 打開防火牆 nova s​​ecgroup-add-rule default tcp 22 22 0.0.0.0/0 nova s​​ecgroup-add-rule default icmp -1 -1 0.0.0.0/0 這個時候,就可以直接ssh到虛擬機上。 ssh -i .ssh/id_rsa root@vmip Floating IP訪問 如果希望訪問floating IP 申請floating IP nova floating-ip-create # nova add-floating-ip vm1 172.17.1.7 關聯vm # nova add-floating-ip vm1 172.17.1.7 ssh訪問虛擬機 ssh -i .ssh/id_rsa root@172.17.1.7 查看安全組和規則 # nova s​​ecgroup-list # nova s​​ec

Fedora 17 安裝Openstack

現在真的夠熱鬧。Fedora 17安裝Openstack,文檔寫的非常詳細。 http://fedoraproject.org/wiki/Getting_started_with_OpenStack_on_Fedora_17

OpenStack Essex on Ubuntu 12.04 for vlan

1. Configure with the following Network Interfaces: # The loopback network interface auto lo iface lo inet loopback # The primary network interface auto eth0 iface eth0 inet static address 172.17.0.1 netmask 255.255.0.0 network 172.17.0.0 broadcast 172.17.255.255 gateway 172.17.1.254 # dns-* options are implemented by the resolvconf package, if installed dns-nameservers 168.95.1.1 dns-search test.com auto eth1 iface eth1 inet static address 172.17.0.1 netmask 255.255.0.0 network 172.17.0.0 broadcast 172.17.255.255 auto eth2 iface eth2 inet manual up ifconfig eth2 up 2. ifup eth1 && ifup eth2 3. apt-get update && apt-get -y dist-upgrade 4. download OpenStackInstaller 5. ./OStackinstall.sh -F 172.17.0.1/24 -f 10.1.0.0/16 -s 512 -t demo -v kvm 6. cd OpenStackInstaller 7. . demorc or source demorc 8. ./upload_image.sh -a admin -p openstack -t demo -C 172.17.0.

install openstack essex

一:install ubuntu 1:download ubuntu 12.04 http://releases.ubuntu.com//precise/ubuntu-12.04-beta2-server-amd64.iso 2:install OS apt-get update apt-get upgrade 3:sudo -i 4:networking These instructions are for using the FlatDHCP networking mode with a single network interface. More complex configurations are described in the networking section, but this configuration is known to work. First, setup your /etc/network/interfaces file with these settings: eth0: public IP, gateway br100: no ports, stp off, fd 0, first address from fixed_range set in nova.conf files. Here's an example: # The loopback network interface auto lo iface lo inet loopback # The primary network interface auto eth0 iface eth0 inet static address 172.17.142.16 netmask 255.255.0.0 # Bridge network interface for VM networks auto br100 iface br100 inet static address 192.168.100.1 netmask 255.255.255.0 bridge_stp off bridge_fd 0 5:install bridge Also install bridge-utils

Swift雲存儲技術詳解:綜述與概念

OpenStack Object Storage (Swift) 是用來創建冗餘的、可擴 ​​展的對象存儲(引擎)的開源軟件。通過閱讀Swift的技術文檔,我們可以理解其中的設計的原理和實現的方法 。 Swift項目已經進展有兩年了,對外開放也一年有餘,在國外的社區你可以獲得許多幫助,但在國內只能找到一些零零散散不齊全的資料,許多人更喜歡坐享其成,而不是參與其中。本人於9月底開始接觸swift,剛開始看文檔的時候一知半解,有幸閱讀了zzcase等人的博客,才得以入門。非常贊同鄭燁在某本書序言中所說的話:“翻譯向來是一件費力不討好的事情。” 。本人本著知識共享、共同進步的目的,與諸位分享。隨著對swift設計原理的理解和源碼的深入,文檔經過數次反复的修改,希望對各位學習swift的童鞋有所幫助,水平有限,若各位發現有錯誤之處,懇請指出。文檔中的紅字部分錶示還需斟酌,歡迎提出各種建議和想法。 轉載請註明譯者和出處,謝謝! 原文鏈接: http://www.cnblogs.com/yuxc/archive/2011/12/06/2278303.html 1. Swift Architectural Overview Swift 架構概述 1.1 Proxy Server 代理服務器 代理服務器負責 Swift 架構的其餘組件間的相互通信。對於每個客戶端的請求,它將在環中查詢帳號、容器或者對象的位置並且相應地轉發請求。也可以使用公共 API 向代理服務器發送請求。 代理服務器也處理大量的失敗請求。例如,如果對於某個對象 PUT 請求時,某個存儲節點不可用,它將會查詢環可傳送的服務器並轉發請求。 對像以流的形式到達(來自) 對象服務器,它們直接從代理服務器傳送到(來自)用戶 — 代理服務器並不緩衝它們。 1.2 The Ring 環 環表示存儲在硬盤上的實體名稱和物理位置間的映射。帳號、容器、對像都有相應的環。當 swift 的其它組件 ( 比如復制 ) 要對帳號、容器或對像操作時,需要查詢相應的環來確定它在集群上的位置。 環使用區域、設備、虛節點和副本來維護這些映射信息。環中每個虛節點在集群中都 ( 默認 ) 有 3 個副本。每個虛節點的位置由環來維護 , 並存儲在